Archives for December, 2016

Let your Eyes Control Your Game: Part 2: PUTTING

This is Part 2 of the Swing Tips to let your eyes control your game. Your eyes help your feel the distance and direction of every hit. In putting, when your eyes focus on the ball during your swing, they force your head and shoulders to hit through the ball and to avoid lifting up during your putt.

Putting is a head game. If you don’t think you can sink a putt then you are destined to miss it – – – even the short ones. Confidence is a critical factor in making putts. No guts, no glory. So you better start by committing to sinking every putt. Decide that you are going to accelerate your putter through the ball and up the target line that you choose. Now you are ready to let your eyes FEEL the distance and your shoulders swing like a pendulum as your putter hits dead center on the face.

Have I got your attention? All of the following points about using your EYES to sink putts are wasted if you don’t start with a Positive Mental Attitude and the right mechanics. Your shoulders do all the work.  Your elbows, wrists and fingers are locked on your putter. If you can’t lock them, practice with your GOLFSTR+ to make sure that your leading wrist is locked. Now use your eyes to make your putt on autopilot.

  1. On your approach shot to the green look for 2 levels on the green. You want to reach the perfect level with a high shot (and very little roll on the green) or a chip shot to roll your shot up to the hole.
  2. When your ball lands on the green watch the direction of the roll but be careful to discount any slice or hook caused by a poor swing of your club.
  3. See the breaks and determine a target where you need to aim to handle the break.

    During every putt, watch the break as your ball slows down to use this knowledge for your next putt.

  4. When putting, your last visual check should be up your target line for distance and direction. As your eye traces back to your ball, stop moving your head and keep your eyes focused on the back of your ball. Let you putter continue to trace back on the same line and then through the center of your ball as you swing up your target line.
  5. Putting is only successful if you can read the green. You can only choose your line and your speed. After that you only have 1 task. Impact on the center of your putter and hit the STRAIGHT LINE that you chose in your setup.
  6. Dave Stockton’s putting tip is to putt with your leading hand. The back of that hand has to continue to point at the target line even after impact as you are putting with a locked flat wrist.
  7. Use your eyes to see the distance you want to putt. Take a practice swing to FEEL the amount of swing you need to hit your ball that distance. Look at your target distance again and run your eyes back along the target line to STOP at your ball as your putter swings back on the same line and then through the ball on the same line as you change your focus from distance to point of impact which is dead center on your putter face.

GOLFSTR+ is a great training aid to help you learn to putt with a locked wrist. When you practice with GOLFSTR + it give you the confidence that you need to take with you during your round of golf. Buy one today at www.golfstr.com

Save

Share
Read more →

Let Your Eyes Control Your Game: Part 1

We all know that focus is critical for consistent golf but there are DO’s and DON’Ts in golf to help you win at this game. Of course you need to keep your focus on your swing and your target but your eyes can destroy the outcome if you don’t use them properly. This is a collection of the important areas where your eyes must be used to calibrate your brain for distance and direction. Once you take the wind, humidity, temperature into consideration your eyes need to take over.

This is a game of feel and mental control but let your eyes put your body on autopilot.

Part 1: Drive, Fairway and Approach Shots

  1. Jack Nicklaus always said that you need to line up all shots by choosing a specific spot where you want to land your ball.
  2. See the distance to a bunker or obstacles and choose your club and direction to make sure that your next shot is an easy shot.
  3. Use your practice swing to determine if you will see your shadow or tree shadows move during your swing. Understand it, accept it and forget it. Use your focus on your ball to ignore moving shadows.
  4. See the lie of your ball. Is there a clean approach to the ball or will you be hitting heavy grass before the ball? Get your ball out of the deep rough with a shorter club and a steeper swing down and through the ball. Hitting to safety is your only objective.
  5. Watch for changing wind directions before every shot and compensate for it before your swing.
  6. You may want to line up your tee shot with a line or the logo on your ball running diagonally from the inside of your swing path to out (creating a draw swing). Your mind will see that line and can use it to avoid a slice swing
  7. Focus your eyes on the back of your golf ball. (Don’t watch your club

    Keep your eyes on your ball until impact before you complete your rotation to a balanced finish.

    head in your backswing.) For all of your shots, focus on the impact at the center of your club face to control the direction of you shot. [Hint: You can’t see the instant of impact but you better test it out with a marker or powder to figure out the right stance because that’s why your shots are going all over the course.].

  8. Sean Foley said that club face direction is responsible for 75% of the initial direction of the ball. Grip your club lightly during your setup and focus on the square face of you club to your target line.
  9. Don’t rush to look up as you swing. Your focus is on your ball. Looking up early will cause you to top the ball and hit a grounder into a pond or bunker. Stay down and get your body through the shot as you rotate and lift your head and body to a balanced finish.


Let your eyes control your game.  See your ball during your swing. Practice with your GOLFSTR+ to learn to keep your leading arm straight or your leading wrist flat in your backswing and to create lag in your trailing arm. Your body should to be on AUTOPILOT so buy one today at www.golfstr.com

Save

Share
Read more →

Check the Sand before You Take Your Stand

Sand Traps have always been a mystery to many of us because they are always changing: wet, dry, fluffy, hard. They change with the course and the weather as they dry out. Then you have lies that are uphill, downhill, sitting in a foot print, “fried egg” or buried in the overhanging edge. I was glad to see that Golf Digest recently gave us a simple set of rules to escape the 2 types of sand.
Type A: Deep, soft, dry sand
Type B: Shallow, firm, wet sand

Type A Sand: In soft fluffy sand it is very easy to take too much sand and leave the ball in the bunker. Bounce is your best friend here. You need to be able to make a full swing without the fear of digging deep into the sand. Here are a few tips to maximize the amount of effective bounce at impact (for righties).

This California view may be gorgeous but if you land in these bunks, your full swing in that soft sand better catch some sand before the ball or your are swimming.

• Stand with your ball forward of center
• Wiggle your feet down for stability and compensate for depth by gripping down.
• Take an open stance (toes lined-up left) and club face open (edge lined up right of target)
• Hands even or slightly behind the ball at address
Full follow through with the club face pointing at the sky and take sand before and after the ball.

Type B Sand: Firm sand or shallow sand does not allow for the club to dig very much. Thus, it is very easy for the club to bounce right off the sand at impact and hit the middle of the ball, sending it to unknown territory.
• Line up your ball in the middle of your stance.
• Club face square to your target.
Hands even or slightly forward of ball.
Finish your swing with a short, low follow through.
• For green side shots you still need to take sand before and after the ball (but a lot less in firm sand).

Old Sand Tip: Swing to lift the sand, your ball and an imaginary quarter sitting beyond your ball.

Other sand tips include using a Gap Wedge or Pitching Wedge for longer shots where you take less sand or a clean hit by impacting the ball first. Using a longer club is no advantage if you hit the bunker lip on your way out. Buried in the overhang? Pound your sand wedge directly into the bottom of the ball to pop it up & out or you should take an unplayable penalty with a drop in the trap if the top edge is overhanging.


COMMON SENSE PREVAILS from the Golf Gods: Rules of Golf Update, January 1 2017

On a green if a ball is accidently moved by a practice swing, a kick, a drop of a ball marker or the pickup of a ball marker by any player, the ball is replaced and there is NO stroke penalty.

On the green if your ball is move by wind or rain or gravity, you must play the ball as it lies and there is NO stroke penalty.

On the fairway, rough or bunker (anywhere off the green or teeing surface) if a ball is moved by activity of the player, the ball is replaced and the player gets a ONE stroke penalty.

On the teeing surface if a ball is moved by mistake (during the setup or practice swing) it can be replaced WITHOUT penalty.

Practice makes perfect with GOLFSTR+ in bunkers too. Your leading wrist stays flat throughout your follow through. No SCOOPING. Buy one today at www.golfstr.com


Save

Save

Save

Save

Save

Share
Read more →

Find Your “G” Spot in Golf

We play this game for personal fulfillment and self-gratification. It feels so good to hit that perfect drive and then landing it where you planned to hit it. The correct club face impact is critical for the perfect climax that we all want. Watching the motion on Tiger’s driver in super slow motion at the point of impact (during the Hero World Challenge Tournament) helped me discover the importance of finding the “G” Spot. Passionate golfers will be pleased to hear that the “G” stands for Great Spot.

A Great drive keeps you out of the rough and long enough to simplify your next shorter shot into the green. It makes this game so easy. It gives you the confidence that your next hit into the green will be a winner. These 3 observations are so important for the right club face impact.

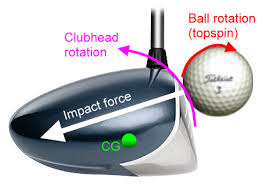
Impact should be centered and just above the horizontal center line to cause Clubhead Rotation and more lift without killer topspin.

Impact should be centered and just above the horizontal center line to cause Clubhead Rotation and more lift without killer topspin.

1/ In super slow motion I saw Tiger’s ball flatten as the driver face rotated along its horizontal axis. The impact on the top half of the club face allowed the face to actually bend backwards (about 5 degrees) to increase the launch angle (before it snapped back to its original position). I could not tell if the flexibility came from the shaft or the head of the club but it sure highlighted the need to impact your ball on the topside of the center line of your club face. That’s the “G” Spot. By the way the climax of that drive was spectacular and long.

2/ In a recent blog, Hank Haney also pointed out that recreational golfers revert to their 3 wood for more consistent hits when their driver is not working. He stated that “higher loft give you more control. But, losing the distance from your driver is a big mistake.”  Impact above the centerline of your driver club face will give you more loft (as stated in point #1).  What he did not mention was that the recreational golfer may by impacting their driver below the “G” Spot. Impact on the bottom half of the face may be dropping the face angle, adding to their top spin and killing their distance.

3/ Tiger is most likely using stiff shafted clubs. If his club face flexes up at impact, can you image what your regular flex or senior flex graphite shaft is doing? After I hit a series of good drives my mind gets revved up. I tend to rotate my hips too early, pull my driver into my body and impacting my ball on the outer part of the club face. That torque on the outer part of the club face launching my ball well to the right of my target line and normally into trouble. That’s another problem we all need to avoid.

Practice your swing with GOLFSTR+ and spray your driver club face with Dr Scholl’s Foot Power to see the point of impact on your driver face. Tiger Woods has found the G-Spot and you should too.

Christmas Discount:   For a 15% discount Use Coupon Code:   Xmas16.    Buy your GOLFSTR+ today or buy this wonderful Christmas Gift at www.golfstr.com

xmas-promo-banner-2016-golf-tips


Save

Share
Read more →