Welcome to YOUR Swing Support Center, a blog with tips to help you transition to your new straight leading arm back-swing. This blog allows us to share information which we find in articles by golf professionals or success stories submitted by GOLFSTR users. These tips have helped me and I hope they help you too.

Bill Curry, inventor of GOLFSTR

Archives for the ‘Swing Solutions’ Category

Amazing Solution for the Dreaded Bunker Shot

We have all struggled with the bunker shots, especially when we are playing in a match where every stroke counts. A messed up shot on a fairway is a pain but 2 or 3 attempts to get out of a bunker is a real disaster. We all land in bunkers so wouldn’t it be fantastic if we knew that we could get out in our first attempt?

I was excited to watch a friend escape a bunker with a perfect swing. She had taken a lesson from a PGA Certified Instructor who showed her the ideal bunker escape shot:

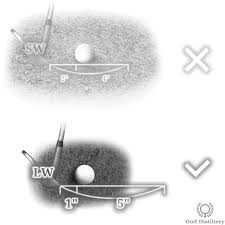
1/ Using your sand wedge setup with an open stance and the ball in the center of your stance and weight slightly forward (on your leading foot).
2/ Wiggle your feet down about an inch into the sand for stability and to lower your swing depth in the sand.
3/ Open your club face so that the face points almost straight up from the sand (depending on the distance that you want your ball to fly). You still need to make a three-quarter to full swing and finish your follow-through.
4/ KEY POINT: Imagine a quarter placed in the sand beyond your ball. Your goal is to launch your ball, the imaginary quarter and sand on to the green. Depending on the distance you want to fly your ball take a three-quarter swing to power the head of your sand wedge under your ball and LAUNCH YOUR BALL & SAND (about 3 to 5 inches) BEYOND THE BALL ONTO THE GREEN.

Unfortunately after working on this method I would still leave about 30% of my bunker shots in the bunker.

Improved Solution

Use your open faced sand wedge and stare at the sand just in front of your ball to take the ball and that sand out of the bunker with your full swing.

Amazing Discovery
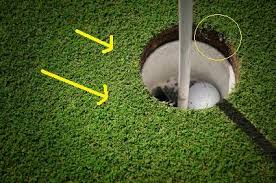
I discovered that if I STARE AT A SPOT IN THE SAND ABOUT 1 INCH BEYOND THE BALL DURING MY SWING I can now make most of my bunker shots. I have never heard a pro recommend this trick. If I want to land my ball further across the green, I just focus on a spot about 2 or 4 inches beyond my ball.

After you try this revolutionary method out, I hope to hear from you. I realize that it’s difficult to change your focus from your ball to a point in the sand beyond your ball. Just drop a number of balls in a practice trap and feel the thrill of success before you take this trick to the course. Start enjoying your bunker play forever.

You still need to swing with a straight leading arm so practice this shot with your GOLFSTR+. Buy one today at www.GOLFSTR.com . Try out your new bunker shot and drop your comments in below.

Golf Truism #54: Golf balls are like eggs. They’re white, sold by the dozen and you need to buy fresh ones each week.

Share
Read more →

Difficult Shot ? Take Your Medicine !

I hope you enjoyed watching the WGC – Dell Technologies Match Play as much as I did. Most of the early televised matches were very close so every hole won or lost was critical for each player. There were a number of international players who added to the suspense. I always found myself rooting for one of the players in every match. Typically I found myself rooting for the underdogs and they surprisingly came out on top.

There were 8 playoffs at the end of Round 3 to eliminate a number of players from the 64 player field. In those playoffs 7 of the 8 matches were won by the underdogs. The #3 seed, Jon Rahm, was the only low seeded player to win his playoff.

One of the most exciting matches was between Bryson DeChambeau (#5- the giant killer) who was booming every drive against one of the smallest players in the field, an Englishman, Tommy Fleetwood (#22). Tommy was leading the match by 1 over Bryson going into the 18th hole. Both shot long tees shots (328 and 338 yards) but both landed in trouble in the rough.


Tommy landed his tee shot on a patch of grass in a creek where he had an impossible stretched-out stance with low hanging branches leaving a gap between himself and the hole (at least 20 feet above his location). He had a clear 69 yard shot to the hole but he realized that a low shot up hill would either hit the low hanging branches or never stop as it passed over the green. Adding to the pressure, Bryson had a clear up hill shot to the hole. Losing the hole to Bryson would result in a playoff.

Tommy Took his Medicine
Tommy realized that he had 3 more shots to tie the hole and win the match only if Bryson played a poor chip and then missed his birdie putt. Tommy “took his medicine” to miss the low hanging branches and pitched 91 yards to the rough on the other side of the green but away from the tree. He landed his chip about 8 feet from the hole and sank his par putt after Bryson missed his own 8 foot birdie putt.

Tommy’s path is marked in blue on the left side of the fairway and Bryson’s path is marked in red. Then Tommy had to hit 92 yards to the right side of the green in order to have a shot at the green and sink his putt.

It was fun to watch Tommy make his decision to take the shot which was the lesser of 2 evils. The shot was very difficult but he could not afford to take an unplayable penalty shot or he would have lost that hole and possibly the match.

A Great Lesson for All of Us
Don’t take the hero shot especially when the odds are stacked against you. Depend on the shot that will give you the best chance to recover. I don’t think that many recreational players could have made all 3 shots that Tommy had to make to win the hole but it was a great lesson for all of us. Golf is a game where dumb shots don’t payoff. If you hit into a bad location it is far better to take your medicine and waste a shot by hitting to an easy recovery location than it is to end up with a high score on any hole.

Learn to take your medicine and control every shot by practicing with GOLFSTR+. Buy one today at www.GOLFSTR.com

Golf Truism #53: It’s amazing how a golfer who never helps out around the house will replace his divots, repair his ball marks and rake his sand traps.

Share
Read more →

Reading the Grain of the Green

We often hear TV commentators refer to the impact of the grain direction of the grass on greens. The grain definitely affects the speed of your putt but it appears that greens with Bermuda Bent Grass will affect the direction of your putt more than any other type of grass growing on greens. When you golf in Hawaii or the Caribbean islands and tropical Florida you definitely need to read the Bermuda grass which is used on most of the greens.

The following information came from an article written by Mark Immelman, brother of PGA TOUR professional Trevor Immelman.

Grain Affecting Your Putt (especially on strains of Bermuda Grass):
Grain is the direction that grass grows flat on a green. [Slope of the green (or gravity) has a much greater effect on a putt than the direction of the grain but grain direction will slow down putts when putting into the grain or speed up putts when putting with the grain.] By walking around the putting line of your ball to the hole, you can see lighter green areas where the grain is running away from you and darker areas where the grain in running toward you.

Reading the Grain at the Cup:


Grass grain flows to the clean cut side of the cup. Your ball will roll faster in that direction. In this image the ruff cut is on the right side.

The grain of a green has its greatest effect as the ball slows down near the cup. The cut of the grass around the cup will always have a jagged edge on the side where the grain is growing away from the holes. If the clean edge is on the high side of the hole your ball will tend to break into the hole at a faster pace from that side.

Gravity over grain:
Mark Immelman said “I know and trust gravity enough to believe that it will always beat grain when influencing the roll of the ball.” That being said, every so often you may face a putt where the grain is running against the slope of the hill. In that case, play for a little less break than normal, but never aim below the cup and expect the grass to push the ball up the hill. On the flip side, if you happen to face a breaking putt with the grain running in the same direction as the slope, play for more break to allow for the combined efforts of gravity and grain on the rollout of your putt.

Green imperfections caused by golfers using their putter as a crutch near the hole or a poor hole cutting job will always redirect your ball unless you have enough speed at the hole. They are called the “rub of the green”
Strike putts solidly on grainy greens and late in the day when grass on greens will start to lift up toward the sun or rough up with a lot of wear and tear during the day. A mishit putt on bent grass (Bermuda Grass) can still roll out significantly, but a green with coarse, thick grass will normally slow down your putt. Expect speed differences on bent grainy grass from conventional fine grass greens. Learn the green speeds on the practice green before you play a round of golf and practice with GOLFSTR+ to make flat leading wrist putts on your chosen target line. Buy one today at www.GOLFSTR.com

Golf Truism #51: It takes longer to learn to be a good golfer than it does to become a brain surgeon. On the other hand, you don’t get to ride around on a cart, drink beer and eat hotdogs when you are performing brain surgery!

Share
Read more →

The Pros Do IT Too!

I loved watching The Players Championship at Sawgrass last week. Sawgrass is an amazing course and I hope to play it someday (most likely from the seniors tee). The most exciting part of the match happened on #4 on the final day. Bryson DeChambeau and Lee Westwood had both been playing controlled golf but their games went sideways on that hole. Yes the pros top it, shank it and slice it too!

Watching these champions play like recreational players was pretty exciting. We all know the feeling when we lose control of our minds and our game. Fortunately for them they both got back on track to finish their rounds with respectable scores. What can we learn from this?

The Situation:
Bryson topped a drive into the deep grass in front of the tee boxes. Lee must have been excited about his opportunity to gain some ground on Bryson so he smashed a crazy slice into the water in an out of bounds area. Funny how our minds can mess up opportunities. But wait, the plot thickens. For Bryson’s second shot, he shanked his ball about “50 yards wide of his target”, into a grove of trees and bush. He found his ball but his recovery shot hit another tree on the way out. He ended up with a double bogie and finished his round at -1.

Lee continued his shaky round and finished at Even after missing a make-able putt on the 17th hole which would have put him in a playoff with Justin Thomas.

The Opportunity
1/ We were watching the best of the best. We can only imagine the errant shots which were made by others who didn’t make the cut. All golfers make poor shots. Golfers with low scores know how to shake it off and get on with their game. Ben Hogan said, “The most important shot in golf is your next one.”
2/ I just watched a champion take a 7 on a par 3 during a championship match. Instead of composing herself after hitting over a green and into the water on an island green, she quickly chipped over the green again and into water on the other side of the green. After another poor chip and 2 more putts she was steamed. She will regret her hasty action if she lost the match.
3/ Bryson sets up to drive, chip and putt as stiff as a board. Aren’t we supposed to relax our muscles to get the most power and best control out of them? He goes against every rule that we have ever heard about golf swing perfection. Unless you have the body and mentality of Bryson: DON’T TRY IT.
4/ We all need a fiancé like Lee Westwood had on his bag. Helen Storey helped him get over so many poor shots in his final round. If only she could have sunk that key putt for Lee on the 17th. Justin Thomas won the tournament but in my mind, Helen was the star of the show.

Lee Westwood has depended on his caddie and fiance to help him keep his mind under control since 2017. It’s working.

After every poor shot you make, get your mind back on track. Just put Helen in your mind to get you back on track. DON’T RUSH THE NEXT SHOT. Practice with GOLFSTR+ and remember how to keep your leading arm straight through impact for every shot and putt. Remember your limited lag for chips and the power that you generate when you take your time to lag your club. Stay calm and relaxed. Buy one today at www.GOLFSTR.com.

Golf Truism #50: It is surprisingly easy to hole a 30 foot putt – for a 10

Share
Read more →

The Science of Plumb-Bobbing with your Putter

You may have seen Justin Rose or other professional golfers try to read the break of a putt by using their putter as a Plumb-Bob (PB). Standing behind your ball and using your putter to determine the break of a putt is USELESS. PB only helps you understand the break of the green UNDER YOUR FEET. Since your ball breaks the most as it slows down near the hole, you should only use PB FROM THE HOLE SIDE of the ball’s path to the hole. You rarely see this done correctly by the pros on TV.

When to Plumb-Bob
1/ Don’t waste your time plumb-bobbing when you can see an obvious break on the path from your ball to the hole. You still have to estimate the amount of break for your putt.
2/ If you can see 2 or 3 breaks on the path for your ball (DON’T PLUMB-BOB) just make your best guess where your ball will break to reach the hole and prey for a 2 putt green.
3/ Ideally you should plumb-bob if you can’t see the break on a smooth green for up to a 10 foot putt. Slight breaks on a downhill putt are the most difficult to read and should be read by using PB.

CALIBRATE YOUR PUTTER BEFORE you ever Try to Plumb-Bob
Every putter head has a different weight so it may change the angle of the shaft as it hangs down from your hand. In any building, close one eye (remember to always use the same open eye for PB) and hold your putter with an outstretched arm as you line up a specific side of your shaft facing the frame of a door (not including the grip). Change the orientation of your putter head until one side of the shaft lines up perfectly with the frame of a door and remember that exact orientation.

Always use the SAME open eye, SAME side of the shaft and SAME direction of your club face FOR ALL OF YOUR PLUMB-BOBBING. [I use my right eye to line-up the left side of my putter shaft while using my right hand to hold the putter with the putter face pointing directly at the hole.]

Stand in line with the hole and your ball. Then hold your calibrated putter to line up with the hole. This example shows the shaft is on the left of the ball and that’s the high side of the green from where the ball will break down to the hole.

Plumb-Bobbing on the Green
1/ Stand below the hole (but fairly close to the hole) and ONLY use your PB eye (close the other one) to first line up the center of the hole with the center of your ball.
2/ Then hold your putter in front of that eye with the correct putter face orientation (as it was calibrated) and line up the BOTTOM of the correct side of your putter shaft with the center of the hole.
3/ The UPPER end of your putter shaft will only line up with the center of your ball if there is no break at the hole. If the correct side of your shaft lines up on one side of your ball (the left of right side), that side is the HIGH side of the green so your ball will break from that side down to the hole as it nears the hole. You can only practice putting to understand how much break to expect.

You still need to account for the initial break that your ball may make as it starts along the initial 75% of the path to the hole. WARNING: Plumb-Bobbing only helps you estimate the direction of the break near the hole (or more accurately where your feet are standing). The Science of Plumb-bobbing only gives you the direction of the break. The Art is in estimating the AMOUNT of break. Practice your putting with GOLFSTR+ for a flat wrist swing from your shoulders. Buy one today at www.GOLFSTR.com

Golf Truism #49: The only thing you can learn from golf books is that you can’t learn anything from golf books, but you have to read an awful lot of golf books to learn it.

Share
Read more →

Small Details Pay-off in Golf

Golf can be such a frustrating game because very minor errors can add a stroke to every hole you play. Mishitting a fairway shot or burning the edge of a hole with a short putt are so easy to do if you don’t pay attention to the small changes required in your stance or grip. Changing wind and contour of the ground always impact your shots but you need to appraise and adjust for every condition. That’s why you can always improve your game. Check out these tips.

Tee Height: If you normally use your 5 wood to hit off the deck on the fairway, don’t tee it up to use it like a driver on the tee. Don’t tee up with the ball off the heel of your leading foot for a 3 or 5 wood (instead of your driver). I learned this the hard way. After hitting 3 duck hooks on 3 successive holes I finally learned that my brain was not adapting.

The more beautiful the course the tougher it is to navigate. Even a flat course has down and side hill lies. Don’t ignore them.

Adjusting for Up or Down Slope in Your Stance: Always adjust to swing with the plane of the slope. Adjust your feet and shoulders to swing up on an up slope and down on a down slope. Use a lower lofted club for an up slope (to compensate for the distance that you will lose with your higher trajectory shot) and a higher loft club for a down slope.

Adjusting for a Side Slope: It’s pretty easy to adjust for a ball above your feet as you need to compensate for the amount of distance and direction that you will pull your shot. It’s much harder to adjust your swing for a ball on an angle below your feet. The heel of your club may contact the ground before it reaches the ball. A sever slope below your feet will force you to take your medicine and chip out of that location before you consider taking a full swing.

Sinking Short Side Hill Putts: I recall seeing Ernie Els take a 9 while attempting about 6 putts to sink a side hill putt. A firm putt which breaks downhill is risky (DON’T DO IT). Plan for a putt above the hole that dies downhill into the hole. If you miss, at least you will have a short putt. [Short putts on a FLAT surface should all be firm and in the hole as weak putts may move away from the hole with any imperfections near the hole.]

Planning for a Downhill Putt: Speed and break are both critical. Hopefully you can learn from the putting speed and break attempted by another player in your foursome. I can’t help you with the speed but if you can’t see a break you should use your putter as a plumb-bob. Stand below the hole, directly in-line with the hole and your ball. Hang your putter in front of you so that the putter shaft lines up with the center of the hole. If the upper end of your shaft (below your grip) lines up on one side of the ball, that is the high side of the green where your ball will break from.

NOTE: Because every putter has a different head weight, you need to calibrate your putter by lining it up with a door frame in your house before you use it on the course for plumb-bobbing. Our blog next week will provide more details on when and how you should plumb-bob.

There are so many rules that you can apply to golf to improve your game. Learning the proper swing with GOLFSTR+ with 6 swing fixes is a good starting point. Solving problems on the course is a life long journey. Buy one today at www.GOLFSTR.com

Golf Truism #48: A ball you can see in the rough from 50 yards away is not yours.

Share
Read more →

Solution for Chipping Frustration!

I recently watched a blog by Danny Maude where he presents a new way to improve short chips (without using a conventional chipping swing). How often do you hit a green and then roll about 2 to 10 feet off the green? Then you hit the chip fat or thin. Something takes over your body so that you just can’t make a basic chip. The problem is all in the use of a combination of your legs, arms and wrists. If you have this problem, stay tuned for your hallelujah moment.

This tip is ideal to help with SHORT chips that run out up to about 20 feet. YOU DON’T NEED TO USE A CONVENTIONAL GOLF SWING TO MAKE THESE CHIPS. The LOWER you grip down on your club the easier it is to control the swing. When you grip lower down your club (even below the grip on your club so that your club is almost vertical to the ground), you have better control of the swing direction. You only lose power. Short chips DON’T NEED POWER. You want short chips with CLEAN HITS and PERFECT DIRECTIONAL CONTROL.


There are 3 types of short chips covered in this blog: Chip & Run, Chip & Check-up and Chipping in Heavy Grass. Higher lofted clubs will give you a higher chip so you can chose from any iron loft up to a 60 degree wedge. Experiment with all lofted clubs to find your comfort level but remember to make adjustments to higher lofted clubs for shorter chips with shorter run-outs.


Setup: Narrow stance, feet parallel and angled 25 to 45 degrees forward, move your hands down to the bottom of the grip or even below your grip and down the shaft to hold your club almost in a vertical position. You will be hitting off the toe of your club as it points toward the ground. Your shoulders should be horizontal to the ground and you need to keep your eye on the ball until after impact.

Chipping in Heavy Grass: Grip down your shaft so that your club is almost vertical. The shortened shaft makes it easier to hit and control the ball. Setup for heavy grass back in your stance and with forward shaft lean.


1/ Chip & Run-out: Use this method to clear the fringe or narrow rough and run out to a distant pin location. Don’t setup with a shaft lean. Ball position is lined up between your toes. Rock your shoulders to swing your straight arms and use gravity to swing the weight of your club. Use a minor wrist release after impact as you swing up your target line.

2/ Chip & Check-up: Use this to clear the fringe or narrow rough and check-up quickly at a close pin. You need height for this shot so use a lofted wedge or sand wedge. No shaft lean. Open your stance a few inches more and use more body and hip rotation while you swing with your straight arms.

3/ Chip in Heavy Grass: Open your club face and setup up with the ball further back in your stance (off your trailing toe) and with your club leaning slightly forward. Use an abbreviated follow-through. This swing requires the most energy of the 3 types of chips.

Recommended: Choose a primary club (like a pitching wedge) for most of your chips to ensure that you get comfortable with the expected height and roll-out for a variety of situations. Only practice will help you understand the right amount of shoulder swing needed to stop near the hole.

This is NOT a conventional golf swing for chipping but it is easy to use if you normally blade or hit fat chips when you are within 20 feet from the pin. Practice these chips with GOLFSTR+ to lock your leading wrist (exactly the same way you would load it to practice putting). Buy one today at www.GOLFSTR.com

Golf Truism #47: If you seem to be hitting your shots straight on the driving range, it’s probably because you’re not aiming at anything.

Share
Read more →

Golf Is Not an Intuitive Game

Anyone who hopes to master the game of golf needs to approach the game with reasonable expectations. There is no such thing as a natural golfer. Understanding swing path and the resulting shape and distance that you can achieve with each club is a great starting point. Learning from a mentor who can recognize your weaknesses and fine tune your swing to improve distance and direction control is definitely an advantage. Anyone can become a “good” golfer but you need to follow some basic principles.

Consider what some outstanding professional golfers have done:
Tiger Woods: He learned the basics from his father but he also had the internal drive to be successful. Unfortunately that drive and attitude got derailed during his marriage break up. That confirms that our metal state of mind has a lot to do with our success.
Dustin Johnson: His strength and skill went sideways with drugs but he is now back on track.
Matt Kuchar: Age must be a factor. Matt was very successful in his earlier years, lost the winning formula and then won the Sony Open in 2019 even with his aging body at 41. [We all remember Tom Watson almost winning the 2009 Open at the age of 59.] Limit your expectations as you age. Work on accuracy as you lose distance.
Bubba Watson: He has never taken a lesson and is totally self-taught. He is one of the longest drivers but direction control and focus for all of his clubs seem to have ended his winning ways. Control your draw or fade to control your success.

Others like Phil Michelson, Jim Furyk, Rory McIlroy and Jordon Spieth have had their ups and downs with their long and short golf careers. So how can we apply their successes to our games? As weekend warriors or want-to-be golfers, what should we do to get the best out of our games?

Mental Attitude: Every mishit ball is a frustration for every golfer. Recognizing the cause is a critical starting point. You need to turn your attitude around by attacking your weaknesses. Start by taking lessons, practicing on the range and calming your mind and body. Learn that a wonderful drive or iron shot will NOT improve by swinging harder and faster.

Physical Conditioning: This is typically a problem as we age and lose our flexibility. Spend time daily to improve your basic strength and range of motion. Strained muscles can help your game by forcing you to slow down or limit your motion. Use your recovery period as a learning experience because your game will often improve when you slow down to improve your lag and get more control & distance for each shot.

Focus and Apply What Works For YOU: After a long slump, Jordon Spieth recently discovered that he needed to create a slight loop at the top of his swing to SHALLOW his club in the downswing (keeping his trailing elbow closer to his rib cage). Swinging from the inside and impacting the inside quadrant of the ball has turned his game around. It may help you too.

It’s difficult to see from this image but Jordon discovered that he needs to lower his downswing plane so that his trailing elbow nearly grazes his rib cage. The shallowing of his swing plane has made all the difference in his recent success.

Keep a record of what works for Your Game to control distance and direction for your driver, irons and putter. Refine those points as your confidence improves and your scores will drop. Practicing with GOLFSTR+ will help you overcome your swing flaws. Buy one today at www.GOLFSTR.com

Golf Truism #46: No matter how far its shaft extends, a ball retriever is always a foot too short to reach the ball.

Share
Read more →

Take More Time for Your Full Backswing

Learning to keep your leading arm straight in your backswing is a critical step for more distance. Unfortunately, too many of us rush the backswing and never benefit from the straight leading arm. Limiting your backswing is one way to ensure that your arm is straight but it’s not the ideal solution. You should take more time to complete your backswing (with a straight arm & cocked wrist) and to start your weight transfer to your leading foot.

Don’t rush your backswing. Our recent blogs have focused on ways to create more time for more rotation in your backswing. By thinking the words “1 aaand 2” to manage the timing of your swing you are not only creating a 2-step rhythm but you are also blocking out other thoughts.
1/ Count “1 aaand 2”, by adding “aaand”. It gives you more time for more backswing.
2/ You may want to try lifting your leading heel to give you more rotation without bending your leading arm.
3/ The more time you take the easier it is to rotate your hips and then your shoulders as you lift your straight leading arm. (Older bodies have less flexibility so it takes us more time to coil up our bodies.)
4/ The power hitter (like Bryson DeChambeau and Dustin Johnson) start their driver takeaway by flattening their leading wrist (IT WORKS!). They naturally cock their wrists for lag at the top of their backswing.

Bryson DeChambeau is the only pro that I have seen with a flat leading wrist for his driver and iron setup. Flatten your leading wrist as the first move in your takeaway.
Dustin Johnson flattens his leading wrist for his irons and its the first move that he makes during his driver takeaway.

Resulting Problems
More backswing coil gives you more power and distance for each club but it generates a few problems.
1/ A longer drive is always helpful but you may find that you have to drop down a club on holes with doglegs.
2/ You will find that you are adding about 10 more yards for most of your clubs. You have to adjust your club selection to hit your greens in regulation. Hitting further with each club is fun to watch but not fun to play when they rocket over your target green.
3/ The worst problem that I found is that can pull some of my shots. To avoid pulls, I still setup square to the ball but I have to focus on impacting the ball on the inside quadrant of the ball.

Don’t get frustrated with your changing game. Accept the fact that you are increasing your distance as that will ultimately improve your Greens in Regulation. Make adjustments with your club selection and your line up to benefit from your NEW GAME.

Don’t complete your takeaway on a low plane as it will result in an over the top slice swing. Your takeaway should be straight back so that you can shallow your downswing and hit the inside quadrant of your ball to create a straight or draw shot.

A good starting point for the game of golf is to learn your straight leading arm backswing. Let your hips and shoulders coil during your backswing as your head stays over your ball. Take more time in your backswing to start your forward weight press. Practice with your GOLFSTR+ to build confidence in your straight arm backswing. Buy one today at www.GOLFSTR.com

Golf Truism #45 Your straightest iron shot of the day will be exactly one club short.

Share
Read more →

Tricks to Swing with a Flat Leading Wrist

In our last blog we recommended slowing down your backswing to allow more time for the weight shift during your transition. We are actually trying to achieve a number of movements during our back swing but you may not realize this. All of the movements seem to melt into one consistent motion. If you miss one key element in your backswing you will destroy the downswing and your perfect impact.

I noticed that the top golfer in the world, Dustin Johnson, starts his takeaway by bending his trailing wrist back to flatten his leading wrist. Bryson DeChambeau sets up with a very rigid straight leading arm and flat leading wrist which points down along the shaft of his club directly out from his leading foot. No other professional golfer setup with this rigid leading arm setup. It actually makes him look like a stiff robot but the power he generates is even greater than Dustin’s so it must be helping.


Dustin ends up bowing his leading wrist at the top of his backswing and adding more angles that need to be adjusted in his downswing. An even worse situation is that many recreational golfers cup their wrists.
Bryson keeps his leading wrist flat at the top of his swing and just unloads his straight arm down and through his ball whipping the head of his club through the ball with the explosive force of a catapult. We all need to learn from his powerful swing.

Hank Haney used these images in Golf Digest to illustrate a flat leading wrist to eliminate angles. Images to the right show cupped and bowed wrists which should be avoided.

Opportunity
1/ FLAT LEADING WRIST: Setting up with a rigid straight leading arm and wrist (like Bryson) is obviously not anyone’s preference (as no one else is doing it on the pro circuit). Why not setup with a straight leading arm, then flatten your leading wrist as the first move in your takeaway, the way Dustin does it.
2/ ADD RHYTHM TO YOUR SWING: Slow down you take-away to give yourself time to flatten your leading wrist and then cock that wrist to create lag at the top of you swing. That slower take-away also give you time to put some rhythm in your backswing as you transfer your weight to your leading foot. To slow down my takeaway I often mentally say: “1 aaand 2” with the rhythm of a 2-Step.
“1” to start my take-away as I flatten my leading wrist
“aaand” as I load up my back-swing with lag and start to shift my weight to my leading leg
“2” to start my downswing. I shallow my downswing from the inside and up my target line to a balanced pose.

Now that I have slowed down my backswing I have added about 10 yards for every club. I love the extra distance but it requires some adjustment to drop down a club for each distance. Practice with GOLFSTR+ to keep your leading arm straight and also to keep your leading wrist flat. Buy one today at www.GOLFSTR.com

Golf Truism #44: The lowest numbered iron in your bag will always be impossible to hit.

Share
Read more →